Showing posts with label Adding Some Class. Show all posts

Wednesday, August 26, 2015

Adding Some Class with Faith of An Edible Mosaic


My long time readers will remember this, but this is my first Adding Some Class with post for 2015 so let me explain.

Adding Some Class with is a series I started last year where I ask another food blogger I admire to guest post here. It was born because I have always felt blogrolls to be inadequate. Instead, why not ask my guest to demonstrate their strengths? I had originally planned to do this monthly but I have since decided that it should be more exclusive group. In fact, I featured only five other bloggers since it's inception: Kim of Cravings of a Lunatic, Alice of Hip Foodie Mom, Nancy of Gotta Get Baked, Susan of The Girl in the Little Red Kitchen and Jennifer of MealDiva. Please read them if you haven't already because they are all fantastic.

Today, I welcome Faith of An Edible Mosaic. I had seen her online in passing over the last few years but had an opportunity to get to know her better when I attended the Food and Wine Conference last month. She was one of the ladies I was fortunate enough to accompany at the lunch before the official conference activities at Shubee's. She not only attended, however. Faith moderated a food photography workshop entitled A Tale of Two Photographers with Julius of Droolius. Of course, I attended their session because I've always felt deficient in this area. I found their presentation helpful because they ignored technical items such as f-stop and aperture and gave some practical advice to improve food pictures by utilizing lighting, angles, props and shadows to the photographer's advantage. Part of the presentation was spent taking pictures of food in order to apply the concepts discussed during the seminar.

When you look at Faith's photographs, you could understandably mistake them for belonging in a magazine or catalog. Her rustic style conveys an authenticity that I've been unable to find anywhere else. She somehow maintains a balance of light and dark hues in many of her photographs. I also appreciate her blog's point of view because she has some Middle Eastern influences into many of her dishes from when she and her husband resided there for a number of years which makes it unique. I haven't even noted her dessert blog called Healthy Sweet Eats yet and she's also a published cookbook author. Please consider purchasing one or more of her books which can be found here. If that weren't enough, she also works freelance as a recipe developer, food stylist and photographer. Inquiries can be made by clicking here. I also haven't even mentioned yet that she's a talent in the kitchen as well. Dishes such as Roasted Vegetable Ravioli in Vegetable Broth, Shrimp Burgers with Scallion Mayo and Italian Sundried Tomato, Garlic, and Rosemary Chicken Hoagies with Melted Fontina Sauce doesn't even scratch the surface of her brilliance.

It is a privilege to host her today:

Hello! I’m Faith and I blog mainly at An Edible Mosaic where I share my recipe collection of international favorites and updated American classics. I also have another blog called Healthy Sweet Eats where I share all healthy dessert recipes (because hey, a girl needs a few options up her sleeve when it comes to dessert, right?).

I had the absolute pleasure of meeting DB at the Food & Wine Conference in Orlando last July. He was funny and kind, and we bonded over crab cakes the first time we met. (How can you not bond with someone when great food is involved, right?) I was honored when he invited me to guest post on his blog and I immediately started thinking about what to make. I knew it had to be good because DB is pretty fabulous in the kitchen.

So, let’s talk galettes for a quick minute. A galette is basically a flat pastry cake, but there are a vast amount of variations. To me (and in my kitchen), a galette usually means a free-form sort of pie, basically with the crust folded up a bit over sweet or savory filling. The end result is a very rustic-looking pastry.

Zucchini is a natural filling choice this time of year because most of us are always looking for new zucchini recipe ideas. Caramelized onion with garlic and thyme lends a bit of natural sweetness while still keeping this dish savory, za’atar adds a punch of earthy flavor, and goat cheese adds a pleasant little tang.

But the real magic of this galette is the flaky, buttery crust. Like a pie, that’s the main reason to make a galette, and also like a pie, this galette is a complete indulgence (despite the fact that it also boasts vegetables). Trust me, it’s worth the buttery splurge though.

DB, thank you so much for having me. I hope we get the chance to meet again in person soon because you are an absolute pleasure.


Za’atar and Caramelized Onion Zucchini Galette with Goat Cheese

Yields 6 servings
Prep Time: 45 minutes
Cook Time: 1 hour


Crust:
1 1/4 cup (160 g) all-purpose flour
1/4 + 1/8 teaspoon salt
1/2 cup (115 g) unsalted butter, chilled and diced
2-4 tablespoons ice-cold water

Filling:
3 tablespoons unsalted butter
2 medium-large onions, halved and thinly sliced
2 large cloves garlic, crushed or grated
1 1/2 teaspoons chopped fresh thyme
1/4 teaspoon salt
1/8 teaspoon black pepper
1 medium zucchini, very thinly sliced
1 1/2 teaspoons olive oil
3/4 teaspoon za’atar
2 oz (60 g) goat cheese, crumbled
1 egg lightly beaten with 1 tablespoon water, for eggwash

Preheat the oven to 400F.

For the crust, whisk together the flour and salt in a large bowl and then cut in the butter with a pastry cutter or a fork until it looks like coarse meal. Add water 1 tablespoon at a time, working the dough together with your fingertips just until it comes together, and only adding enough water so the dough comes together when you squeeze it. Gather the dough together into a ball and then flatted it into a disk; wrap it in plastic wrap and refrigerate until chilled, about 30 minutes.

Meanwhile, prepare the filling. Heat the butter in a large skillet over medium-high heat. Add the onion and cook until caramelized, about 20 to 30 minutes, stirring occasionally. You can turn the heat down or add a splash of water at any point if the onion starts to caramelize too quickly. Stir in the garlic, thyme, salt, and black pepper and cook 30 seconds more. Turn off the heat and set aside.

Once chilled, remove the dough from the fridge. Lay a piece of parchment paper out on your work surface, place the dough on the prepared parchment paper, and top with another piece of parchment (or if you have it, freezer paper works even better because it’s thicker). (Done this way, there is no need for flour to roll the dough out.) Working from the center out, roll the dough out to a circle about 12 inches in diameter.

Spread the caramelized onion mixture onto the dough, leaving a 2-inch border along the outside. Arrange the zucchini on top of the onion, and brush the zucchini with olive oil. Sprinkle on the za’atar, and then the goat cheese. Fold the edge of the pastry up over the filling to create a border and brush with eggwash.

Slide the galette onto a large baking sheet and bake until the crust is golden brown, about 35 minutes, rotating the baking sheet once halfway through.

Serve warm or at room temperature.

There's a couple of things I really appreciate about this dish. First, I have yet to prepare a galette for the website, so I must thank Faith for explaining the concept. I was also intrigued by za'atar because I've never used it but she's inspired me to experiment with it.

Lastly, I highly recommend you follow Faith on all her social media channels: facebook, G+, instagram, pinterest and twitter in addition to her facebook and twitter pages for Healthy Sweet Eats.

Thursday, October 16, 2014

Adding Some Class with Jennifer of MealDiva

Sausage with Garlic Mashed Potatoes & Zucchini

Today, I return to my monthly Adding Some Class with... series with Jennifer of MealDiva. If I can be candid for a moment, I can safely say here that I admire her patience. I originally asked Jennifer to be my guest for August however I had to delay it because of my move. By the time I had revisited the topic, it was the middle of September so Jennifer and I agreed to postpone this until October.

In my mind, Jennifer stands out because the dishes she publishes achieve a unique balance of simplicity and elegance. I especially like her Parsley Vinaigrette, Pancake Mix, and her Curry Shrimp Kabobs with Mango Rice.

Please welcome Jennifer to Crazy Foodie Stunts:

I am so excited to be guest blogging on Crazy Foodie Stunts today! Like DB, I accidently stumbled into cooking while staying home caring for my kids. When you’re a one-income family with a child with food allergies, eating out isn’t an option and so, I learned how to cook and also fell in love! I really love Crazy Foodie Stunts because DB blogs about recipes that seem intimidating for some at-home -cooks and in doing so, he gives his reads encouragement! In fact, he’s even inspired me to try a new recipe or two – like Coq au Vin –my kids LOVED this recipe and devoured the luscious chicken thighs with nods of approval. So thanks DB!

Over on MealDiva, I blog about easy, healthy, common- sense family meals so I wanted to share a household favorite with you today! This uncomplicated, euphoric and down-right gratifying sausage dinner is requested weekly in my house and its often eaten in silence (with brief pauses to give me a thumbs up) until everyone’s plates are licked clean. In my blogging world, sometimes it’s the easiest recipes that are the tastiest. So from my families’ table to yours, enjoy!

Sausage with Garlic Mashed Potatoes & Zucchini

Ingredients:

1 package of cheese and parsley sausage
1 large green zucchini, sliced
1 large yellow zucchini, sliced
1 green bell pepper, sliced
1 sweet Vidalia onion, sliced
2 cloves garlic, chopped
Salt and Pepper to taste
2 tbs. chicken broth/ stock or just water
3 pounds baking potatoes, peeled and cut into quarters
3/4 cup heavy cream
1/3 stick butter
Salt and pepper, to taste
4 cloves garlic, minced

Directions:

Preheat oven to 400 degrees.
In a large, oven-proof dish, layer zucchini, onion, garlic and pepper on the bottom then top with the sausage.
Add chicken stock and bake in a pre-heated over for 40 minutes, flipping the sausage in the middle of the cooking time.
Meanwhile, cook potatoes in water until cooked through then drain and return them to the pot. While still hot, add the remaining ingredients and mash well.
Sausage should be nicely browned before removing from the oven.
To plate:
Layer mashed potatoes then vegetables followed by sausage.

WOW! This is the first time I had heard about her coq au vin success. I'm pleased her family enjoyed it. This sausage dish, however, is a perfect example of the elegant dishes I admire from Jennifer. Before you go, please remember to 'Like' her on facebook, in addition to following her on Instagram, pinterest and .

Jennifer gave me an additional photo which follows:


Thursday, July 31, 2014

Adding Some Class with Susan of The Girl in the Little Red Kitchen

Peach Slab Pie

I believe I met Susan of The Girl in the Little Red Kitchen two years ago when I joined Food Bloggers Network which is a facebook group founded by Jessica of Oh Cake so I was already familiar with her when I joined #SundaySupper Movement where we connected further. We met in person a couple of weekends ago at Food & Wine Conference where I was able to take a picture with her.


In all honesty, I'm a little envious because she and her husband live in New York City and has access to some of the best foods available, such as lamb brisket and ramps. She even has a breakfast recipe category which I find impressive because I'm not awake enough in the morning to produce blog-worthy breakfast dishes.

I also admire Susan because she successfully funded a Kickstarter campaign earlier this year to open a bakery to sell cookies. Susan told me that she should be able to start accepting orders by the end of August. To keep yourself updated on her progress with her bakery, please ensure you 'Like' her on facebook, add her on G+, in addition to following her on twitter, Instagram and pinterest.

And now, I present Susan:

Hi there Crazy Foodie Stunts readers! I’m Susan from The Girl In The Little Red Kitchen and it’s an absolute pleasure to be here today as part of DB’s Adding Some Class series. I’ve had the pleasure of knowing DB virtually for quite some time now and finally had the chance to meet him and his beautiful family in person just a few weekends ago at the Food and Wine Conference in Orlando, FL.

It was a wonderful weekend full of informative sessions on how to become a better blogger, SEO tech babble that went over most of our heads, food, wine and most importantly meeting your online friends in person for the first time. I don’t think words can describe what a pleasure it was to sit and talk with DB and all our #SundaySupper friends throughout the two and a half days we had together. My only complaint is that the time was just too short, especially when we are on opposite coasts and only have these once a year opportunities to see each other.

When DB invited me to post for him today he basically gave me free reign to do as I wished. Since peaches are about to come into their prime and I know for a fact that he can get some really tasty ones in his part of the country, some Peach Slab Pie was in order.

Plus we all know DB is your go-to guy for the savory food but baking is not his favorite area.
Right?

So this pie is the pie for crust lovers. It’s also the pie for people who do not like making pies because it’s rustic, it’s not round and if your dough tears while you’re putting it together you can just patch it right back up. I kept things simple too, just simply peaches, a little sugar and a little cornstarch to thicken things up. You can even leave the peach skins on if you really want to ease into – but I personally don’t care for the texture once they are baked.

Ingredients:
For the crust -
2 1/2 cups unbleached all-purpose flour
1 tablespoon granulated white sugar
pinch of salt
1 and 1/2 sticks (12 tablespoons) unsalted butter, cold
4 tablespoons cream cheese, cold
3-5 tablespoons ice water
For the filling -
5 ripe peaches
2 tablespoons granulated white sugar
1 tablespoon cornstarch
pinch of salt
1 large egg + 1 teaspoon water for egg wash
cinnamon sugar to top (optional)

Directions:
In a medium bowl mix together the flour, sugar and salt. Using a pastry cutter mix in the butter until it resembles small pebbles. Add in the cream cheese and continue to mix with the pastry cutter until it’s broken up.

Add the cold water 1 tablespoon at a time and mix the dough with a wooden spoon until it forms into a ball. You want to make sure the dough doesn’t become too wet. Wrap in plastic wrap and refrigerate for 30 minutes.

Bring a large pot of water to boil and set up an ice bath. Score an X at the bottom of the peaches with a sharp knife. Drop in the boiling water for 30 seconds and remove with a slotted spoon into the ice bath. Let sit for 15-20 seconds and the skins should peel off without a problem.

Very carefully with a sharp knife, quarter the peaches and remove the pit. Slice into 1/4 to 1/2 inch slices, place in a medium bowl. Mix in the sugar, cornstarch and salt and set aside.

Heat your oven to 350 degrees and have a rimmed quarter sheet pan read (9×13 inches).

Lightly flour your work surface and roll out 2/3 of the dough into a rectangle large enough to fit the pan. Transfer the dough to the pan and let the edges hang out (if you rolled it just shy that’s fine).

Using a slotted spoon, scoop out the peach filling leaving the juices behind and spread evenly across the dough leaving a 1/2 inch boarder.

Roll out the remaining dough to cover the peaches and fold the bottom crust over the top to seal. Use the tines of a fork to seal the edges. Brush the top with an egg wash and if using sprinkle with cinnamon sugar.

Bake for 25 to 30 minutes or until the crust is crisp and golden brown. Let cool for 30 minutes to an hour before slicing.

Serve with a scoop of ice cream. Store any remaining pie in an airtight container at room temperature for 2-3 days.

I'd like to thank Susan for being my guest today. One of the reasons is because I absolutely love this dessert because it's baked dish but is forgiving enough for a the beginner baker such as myself. She passed along more pictures of the dish.


Before I leave you, I wanted to give you an update on the ribs dish I published two Sundays ago. Well, I competed using that sauce but only received two votes for best rib. For me, this year was different because Mrs. Stuntman, my daughter, my sister and one of her friends joined me so despite the loss, a good time was had by all.


Wednesday, April 23, 2014

Adding Some Class with Nancy of Gotta Get Baked

Bacon Pesto Parmesan Rolls


Have I got a treat for you...

Like many of my food blogger friends I've made, I met Nancy of Gotta Get Baked through the #SundaySupper Movement. Like the other ladies I've featured here over the last few months, Nancy has a true talent in the kitchen but her skills are very different than mine. As her blog name suggests, she is a baker which requires precision in what she does which is different from cooking. I'd also like to point out that she's a criminal law attorney so I'm awed that she has the time to maintain a busy career, a family and have time to produce delicious food. I'd like to give you a list of my favorite dishes Nancy has made, but I honestly can't choose because they're all so unique.

Something else I admire about Nancy is her writing style. It's often funny, thought-provoking, candid but always sincere. Her straight-forward approach conveys her thoughts in a clear manner and it's something I wish I had. She even has a category of posts called Angry Asian but what makes her different from others is things that get under her skin are very reasonable. How could you argue against common courtesy, cyber-bullying and the public's obsession with celebrities?

Before I leave you with Nancy, I'd like to note my strong recommendation to follow Nancy on twitter, instagram, and pinterest, plus add her on G+ in addition to giving her facebook page a Like.

And now, I present Nancy:

Howdy, readers of Crazy Foodie Stunts! I’m Nancy and I blog over at gotta get baked. I’m honoured to be featured in DB’s Adding Some Class series today.

I had the pleasure of meeting DB through our Sunday Supper group. He stands out not only for being one of the few men in the group but more importantly because he’s highly intelligent, incredibly talented in the kitchen and he’s always challenging himself to be better at what he does.

Given how much I admire DB, I had to think of something ridiculously awesome to make for him. I wanted to go savoury in keeping with the savoury foods DB usually cooks but I also had to bake because, duh, my blog name. Baking’s in my veins. It’s my everything.

Bacon. Pesto. Parmesan. Carbs. These are some of the foods that make my world go round and they also happened to be in my fridge. I combined them into no-knead, overnight savoury rolls.

In the process, I almost burned my house down. Ok, not really (I’m prone to hyperbole) but I did have a smokin’ hot time baking these, literally. I thought I was being brilliant by baking the rolls in my cheesecake pan for easy removal of the rim after the rolls cooled. People, these rolls were bursting with olive oil from the pesto and a generous amount of parmesan cheese. All of that grease dripped onto the bottom of my oven. The fragrance in the air turned quickly from gloriously delicious to acrid and forest fire-y. Plumes of smokes were billowing out of my oven. I.freaked.out. The fire alarm would not stop ringing. My poor dog was beside herself.

As I stood there fanning the smoke out of the open windows, the words “grease fire” kept running through my head. I wondered if I had enough time to google “what to do when the oven’s on fire and you don’t own a fire extinguisher”. Thankfully, it didn’t come to that. I didn’t burn my house down and I ended up with these fabulously crispy, flavourful bacon pesto parmesan rolls.

I used home made pesto but you can also use the store bought stuff.

No Knead, Overnight, Bacon Pesto Parmesan Rolls (adapted from Jim Lahey’s My Bread, Pancetta Rolls at p. 73)

2 cups bacon, diced
2 tbsp bacon grease, cooled
3 cups bread flour
½ tsp salt
¼ tsp active dry yeast
1 ½ cups cool water (55 to 65 degrees F)
flour for dusting
pesto (as much or as little as you want)
grated parmesan (as much or as little as you want)

Cook the bacon in a heavy skillet over medium heat, stirring until crisp and golden. Place the cooked bacon on paper towels to cool. Reserve 2 tablespoons of the bacon grease.

In a medium bowl, stir together the flour, bacon, salt and yeast. Add the water and reserved bacon grease. Using a wooden spoon or your hand, mix together until you have a wet, sticky dough. Cover the bowl and let sit at room temperature until the surface is covered in bubbles and the dough has doubled in size, anywhere from 12 to 18 hours.


When the first rise is complete, generously flour a work surface. Using a bowl scraper or rubber spatula, scrape the dough out of the bowl in one piece. Flour your hands and lift the edges of the dough towards the center, making a round ball.

Generously dust a tea towel with flour and place the dough in the centre of the towel, seam side down. Flour the top of the dough. Fold the ends of the tea towel loosely over the dough to cover it and place it in a warm spot in your kitchen to rise for another 1 to 2 hours. The dough is ready when it has doubled and it holds the impression when you gently poke it with your finger.

Half an hour before the end of the second rise, preheat your oven to 400 degrees F. Use a round 9 inch cake pan or a square 9X13 pan to bake the rolls. I wouldn’t recommend oiling/greasing the pan because oil will pool on the bottom from the pesto as it bakes.

Unwrap the dough and place it back onto the floured work surface. Cut the dough in half. Cut one half into four strips. Place as much pesto and grated parmesan as you want onto each strip. Roll up the strips – note, the dough is very wet and sticky. That’s how it should be so don’t be concerned. Place the rolls in your pan. Repeat the process with the other half of the dough.


Bake in the oven for 30-40 minutes. After the first 20 minutes of baking, I turned the heat down to 380 degrees F because my rolls were browning rapidly. If the top is browning too much for your taste, you can also cover the pan with aluminum foil at this point. The rolls are ready when they’re dark brown.

Allow to cool and then dig in! The edges and bottom of the rolls are incredibly crispy and crunchy, the inside is soft yet a bit chewy, and the bacon and pesto are fabulously flavourful.  The Husband and I couldn’t stop eating them, which isn’t saying much because we’re pigs but honestly, these rolls are delicious.

The rolls are best the day they’re made. Store at room temperature in an air tight container. If they last longer than a couple of days, I recommend toasting them or heating them in the microwave before eating.

That’s it, folks! Thank you so much for inviting me here, DB!

Once again, Nancy has delivered. Bacon, pesto, and parmesan are some of my favorite ingredients. I'd like to thank her for being my guest today!

Before I leave you, please be sure to enter my Carla Hall cookbook giveaway and the garlic lover's prize package giveaway by tomorrow night when they both end!

Wednesday, March 19, 2014

Adding Some Class with Alice of Hip Foodie Mom

I hope everybody's St. Patrick's Day was filled with green food, laughter and friends.

Today I present my second installment of my Adding Some Class with... series. For the month of March, I'd like to introduce you to Alice of Hip Foodie Mom. Alice and I crossed paths when we both did posts for the #SundaySupper Movement, but once I checked out her blog, it was love at first sight-quite literally. One of the things I admire about Alice is the pictures of the dishes she puts up on her blog, which will be on full display below. She also writes about parenting two small daughters addition to her food.

Speaking of her food, I noticed that she isn't afraid to try different things, choosing to prepare different types of dishes instead of focusing on one or two areas such as baking or seafood. Some of my favorites are her Sunday Pot Roast with Risotto Cakes, her different sushi rolls and her Blueberry, Lemon and Thyme Ice Cream.

If you don't know Alice yet, you should. In addition to her blog I noted above, like her on facebook, add her to your G+ circles, in addition to following her on twitter, pinterest, Instagram, and BlogLovin'.

Please welcome Alice to Crazy Foodie Stunts:

Hello Foodie Stuntman readers!

What an honor it is to be here today! Before I get to my recipe I wanted to share a few words about The Foodie Stuntman. I met DB through Sunday Supper. I have high admiration for his recipes and the cooking techniques he shares and all the thought that goes into selecting recipes to challenge himself and to share with you all. It’s not easy running a food blog. Running and writing a food blog amongst, what feels like, a community that’s maybe almost 98% women.


It can’t be easy and again, I really admire his ability to be able to hang with the women. And all of this would probably mean nothing if DB couldn’t cook. But homeboy can.


With dishes like Paglia e fieno, Tea Smoked Roasted Chicken and his Pan Seared Scallops with Lemon-Basil Beurre Blanc, Pancetta, Apple and Fennel! I am continually in awe. So I wanted to cook something special today.


Something special to also celebrate the official day of spring because well, I've been waiting for this day for what feels like months and months. Spring is finally here my friends! And for this girl (this girl living in Madison, Wisconsin) I cannot wait for all this snow to melt and to be able to run or take a walk outside and the temperature to be higher than 20 degrees. To take my daughters to the park! To wear shorts and flip-flops! OK, I might be getting ahead of myself here. . I also have big landscaping plans for my front lawn because right now, it's a big mess.

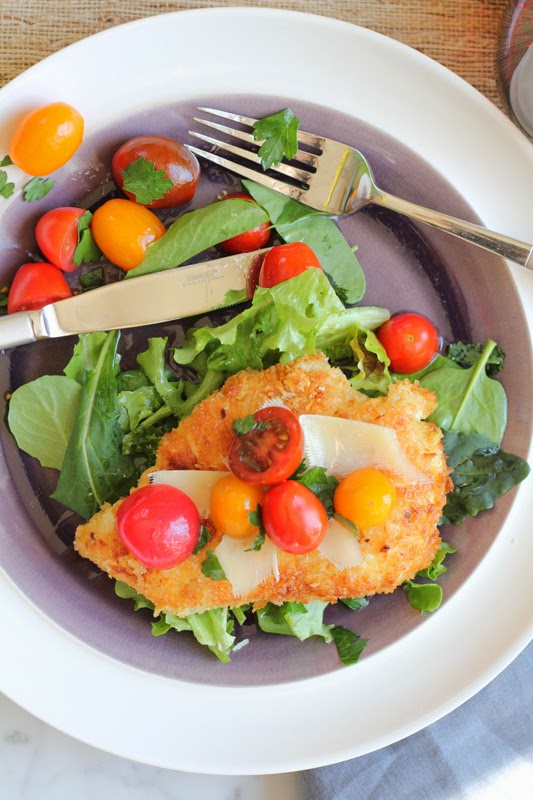
So, in honor and celebration of the official first day of spring, which is tomorrow, I made Spicy Chicken Milanese!


This is typically a summer dish but I could not resist these perfect, little beautiful grape tomatoes. This dish is extremely easy to make, packed with flavor and perfect for a weeknight meal. Crunchy, juicy breaded chicken topped with a juicy, colorful tomato salad and salty slivers of Parmesan cheese.


Could it get any better?

I hope you enjoy this recipe, cheers!

Spicy Chicken Milanese
Adapted from Food and Wine.com

Ingredients:
2 cups variety of grape or mini heirloom tomatoes, halved
1 tablespoon fresh lemon juice
1/4 cup chopped parsley
1 tablespoon plus 1/3 cup extra virgin olive oil, split
Kosher salt
Ground pepper
2 large eggs
3 tablespoons Dijon mustard
1 1/2 teaspoons cayenne pepper
½ - 1 teaspoon red pepper flakes
1 1/2 cups panko + more if needed
4 boneless, skinless chicken breasts
Fresh green salad and/or arugula salad
Shaved Parmigiano-Reggiano cheese


Method: Using a large mixing bowl, toss the tomatoes, lemon juice and parsley with about 1 tablespoon of olive oil and season with salt and pepper. Set aside. I like to do this step first so the flavors can begin to come together.

Next, you are going to set up a dredging station. Using a medium sized, shallow dish, beat the eggs with the Dijon mustard, cayenne and red pepper flakes and season with salt and pepper. Pour the panko into another, separate medium sized, shallow dish. Dip the chicken into the egg mixture, then dredge in the panko; pressing gently to help it adhere.

Using a large skillet over medium-high heat, heat about 1/3 cup of the olive oil until shimmering. Add the chicken and cook over moderately high heat, turning once or twice, until browned and cooked throughout, for about 8-10 minutes, depending on the thickness of your chicken. Transfer the chicken to plates that have fresh greens and/or arugula on them. Please the chicken on top.


Spoon the tomatoes and parsley over the chicken and garnish with the Parmesan cheese. Drizzle a little more extra virgin olive oil if desired. Serve immediately and enjoy!


It's almost criminal how easy Alice's dish is, given it's beauty. I also love how the colors pop off of the plate. I just wish I could have been there to eat this dish the night she prepared it.

Thanks to Alice for being a guest here!

Tuesday, February 18, 2014

Adding Some Class with Kim of Cravings of a Lunatic


Something new for 2014...

Standard operating procedure for almost any blogger is to write a blogroll. I, too, have my own blogroll but I have felt for some time that blogrolls are inadequate.

Primarily the issue I have is that it gives no incentive for the reader to click on the link beyond the suggestion, so I thought why not bring that blogger to my readers? Instead of telling you why I read a blog, ask the author to demonstrate what makes them so exemplary. This is the reason I've created this new (hopefully) monthly series called Adding Some Class with...

For my inaugural post, I present to you Kim of Cravings of a Lunatic. You might remember her on a number of different occasions. In September of 2012, I wrote a guest post for her while she was out of town. More recently she featured me on her website last month where she replicated my Bucatini all'Amatriciana, which happens to be my second post on this site.

I've said it before and I'll say it again. For me, Kim separates herself from any other blogger with her wit and humor. More than any other food blogger I've met online, somehow she draws out my sarcasm. In fact, I wrote a pretty straight forward guest post in 2012 because I figured if I tried to outwit her, I'd lose. For example, when I was sending her some pictures for her Burning Down The Kitchen feature, I told her she couldn't print out my avatar and throw darts at it to which she replied I'd never throw darts. We have a bow and arrow for things like that.


Kim's sense of humor isn't her only quality I admire. For one, she manages two sites. Her other one is Kiss My Smoke where she profiles grilled dishes. None of this would matter, however, if she wasn't a talented cook. She is the proverbial double-edged sword where she makes stunning desserts on top of drool-worthy entreés. On top of all this, her photography is light years better than the chicken scratch I publish here. Just look at that picture above.

So, without further ado, I'll leave you in the expert hands of Kim...

Well hello Crazy Foodie Stunt readers. I'm pleased as punch to be here with you today. Any friend of DB's is a friend of mine.
I'll start by introducing myself. My name is Kim and I am the lady behind Cravings of a Lunatic. It's a blog about recipes, and my silly life. I have to admit most of the recipes are fairly indulgent, but there's the odd salad thrown in just to keep my readers on their toes. I also have a grill site called Kiss my Smoke. I started that one last year to share my love of grilling with my readers. Years ago I learned that asking my hubs to grill was a good way to throw food away. The man gets seriously distracted outside. I'd go out to check on how the food was coming along, the grill would smoking and he'd be in the pool with the kids. Needless to say I had to take over the grill, and what started as necessity turned into passion. I love to grill and pride myself on being pretty dang good at it. Hubs grilling responsibilities have been downgraded to starting the grill, or covering the grill. Occasionally I'll let him do the dishes, because I'm a giver.
I have to admit I was a bit nervous about swinging by DB's place to guest post. I don't do many guest posts. I tend to put too much pressure on myself and get super nervous. Add to that DB's food philosophy and I was a bit of a wreck. I love that DB pushes himself to try new techniques, his approach to cooking is inspiring. He's so adventurous and curious when it comes to food. I knew I didn't want to show up with a simple recipe. I tend to be known for easy, accessible recipes, lots of no bake and quick recipes for busy families. This seemed like a good time to show what else I can do. I used to spend hours perfecting techniques and trying new things. However these days I'm so busy with my family's crazy schedules that I rarely have that kind of time any more. But for DB I made the time, because I adore him.
Like all things in my life good intentions turned into crazy antics. I planned a day that I had lots of time to make these since it's step heavy. Let's just say the plan went to hell in a handbasket pretty quickly. I cleared my schedule, I preheated the oven, I started pulling out the ingredients so I could mise en place. To my shock I didn't have enough cream. I always have enough cream. Usually I have tons of it in the fridge. But not the day I needed it apparently. So a trip to the store was in order. When I got back I continued pulling out ingredients and realized I didn't have enough eggs. Seriously, you would think I would have made a list before running out the first time. So another trip to the store was in order. By the time I got home I needed a nap. No, just kidding. I pulled everything together, cooked and popped it in the fridge. Then I realized with all the trips to the store that I had lost the light for photos. I waited until the next day and was so excited to photograph the dish. I waited for hubs to get home so I could take some in process shots. You definitely need two people for that. We got everything set up and I had him taking the photos while I torched the tops. I got half way through the first one when the butane ran out. Some bad words were said then hubs ran into the garage to grab the big torch. The tip was broken off so we couldn't use it. More bad words were said. I finally decided to pop them under the broiler. Don't pop them under the broiler. I don't find it works the same as a blowtorch. Meanwhile Hubs had run to grab me a new deep fryer and was thoughtful enough to grab me some butane. I had made extras so we grabbed them, and ran into the studio to take photos. We had three minutes to shoot the photos before the light was gone. By the time we were done we were both exhausted and wanted to hurl the Crème Brûlée out the window. Now aren't you excited to make it?
Crème Brûlée Recipe:
Ingredients:
4 cups heavy cream
1 whole vanilla bean, split and scrape the inside bits out
10 whole egg yolks
1/2 cup sugar, (vanilla sugar if you have it)
6 tablespoons superfine sugar (for the final step!)
Directions:
Custard Step:
Preheat the oven to 325 degrees F.
In a medium saucepan combine the heavy cream, the whole vanilla bean and the bits you scraped out of it. Simmer over medium low heat until it starts to steam. Remove from heat and allow the vanilla bean to steep in the warm milk for another 20 to 30 minutes. Remove the bean.
In a stand mixer whip the egg yolks and the sugar (vanilla sugar preferably) until they become pale yellow and thick. This will take a few minutes, and it quite cool to watch. It will go from a fairly vibrant yellow to a gorgeous pale yellow.
Strain through a fine mesh strainer. Some people do, some people don't.
Now while your mixer is on low, pour a little bit of the cream mixture slowly into it. Start with about 1/4 cup and work slowly up to 1 cup of cream. The purpose of this is so you do not cook the eggs. Slow is the way to go. Once you have that first 1 cup added to the egg mixture you can then slowly add the rest of the cream mixture. Mix until combined.
Now you can fill your ramekins with the mixture. Depending on the size you could end up with anywhere from about 6 large to 12 small. Place them in a rimmed pan and place in the oven carefully. Pour cold water into the pan (on the outside of the ramekins of course). Shut the door and wait for the magic to happen. Bake for about 20 to 40 minutes, pull them out before they get brown, and they should have a little wiggle to them in the middle.
Allow to cool for about 30 minutes on counter. Then transfer to the fridge for at least 4 hours, or preferably overnight.
Torching the top step:
Pull the Crème Brûlée out of the fridge. Allow to set on the counter for about 20 or 30 minutes before doing the sugar.
Spoon the superfine sugar over top of the ramekins. Take your torch and start to work on the tops, use a lower setting so you don't over-torch them. Try not to point straight down, an angle is good for torching slowly. You want to torch them to your own taste. Some folks like a nice light, barely golden top, some folks like it darker. You do what works for you.
This is where the fun comes in. That first crack of Crème Brûlée is the best sound in the world. I try to steal the tops of everyone's else's Crème Brûlée. It's like candy.
Serve with a big old smile!
Recipe adapted slightly from The Pioneer Woman
This dish is a tad step heavy. While making it only takes a short time, there are lots of inactive time so be sure to plan ahead. Quite honestly I'd say this is a 2 day project. I would suggest making the custard the night before or in the wee hours of morning, then you can give it lots of time to set up in the fridge. That's super important before you tackle the next stage, which will be torching sugar on the top of it. 
I went with the classic vanilla Crème Brûlée. I tossed some raspberries on top to entice my very picky daughter to try this dessert. The fresh raspberries go perfectly with the creamy custard inside and the candy coating you crack into to get to the custard. This is definitely a dish that requires some patience, some time, and some basic blowtorch knowledge. I would not say it's overly difficult though. The only issue I ran into was forgetting my ramekins cracked months ago so I used tiny canning jars. It worked perfectly. My only regret with this dish was not taking more time to wipe the edges of the dish for the photos. I sloshed the around a lot while making some other dishes at the same time. Next time I'll take the time to wipe the edges for a cleaner presentation. Other than that I couldn't be happier with these. They were a huge hit.
I told DB I'd love to come back another time when I have the forethought to plan well enough ahead so I can share a recipe for cured meat. I have plans to whip up some bacon soon, as well as some pastrami. I've taken great strides to slow my life down recently so I can spend more time doing things that I love. Things like spending time at the barn with my horse, working out and spending time with my family. And I'll be honest, a girl needs more time for important things like watching The Real Housewives and The Kardashians.
Thanks so much to DB for having me today. It was my pleasure to do this. I hope you invite me back again soon.
Toodles and smoochies! xx

I'm completely flattered that Kim went through the effort to make this dessert for me. I can just tell by the pictures that they came out perfect too: the creamy custard contrasts well with the hard shell to create a balance of textures. I'm also a little envious of Kim's blowtorch because I've always wanted to prepare a crème brûlée myself properly, but lacked the equipment. (I'm also reluctant to intentionally light my food on fire. I've never made a claim against my renter's insurance policy and I'd like to keep it that way.)

Oh and homemade cured meat? I absolutely love the idea! Just let me know when The Real Housewives season is complete.

I also referred to pictures, as in plural? Kim took additional shots but added some cinnamon to the shell. Her pictures follow:


Seriously folks, if you aren't already familiar with her, get to know her. You'll thank me for it. She can be reached at Facebook, G+, Pinterest, StumbleUpon, twitter on top of her Kiss My Smoke Facebook and Pinterest pages. Visit her on all of them.