Showing posts with label ginger. Show all posts

Monday, April 13, 2015

Light Stunt: Broccoli with Beef

Light Stunt: Broccoli with Beef


It came as a surprise to me recently that when I was in the produce section at the supermarket with my daughter when she pointed and exclaimed, Broccoli! I like that stuff! When I inquired, she told me that her school cafeteria serves it frequently so I promised to prepare more dishes with broccoli.

Over the last several months, I've gotten to know the staff at the local supermarket so I had them slice a couple of sirloin steaks so that they would be suitable for a stir fry and the prep for the garlic, ginger and broccoli took less than 20 minutes which makes for a great weeknight dish.

The Challenge

Measure my daughter's taste for broccoli.

The Source

The only place where I deviated from my source was in the garnish (I added sesame seeds) so I'll refer you to epicurious.com for the recipe.

Successful?

As I'm finishing my dinner, I look over to my daughter's plate to see most of the beef gone, but only half of the broccoli eaten. She eventually finished the beef but left about one-third of the broccoli which is more than I expected, however I'm now on a new quest to find a broccoli dish that she will completely eat. You can bet I'll be consulting The Flavor Bible.

Sunday, November 16, 2014

Miso Risotto for a #SundaySupper On The Hunt

Miso Risotto for a #SundaySupper On The Hunt


One difference between where I lived in California and where I live in Washington is the number of ethnic grocery stores. They're more common in the San Francisco Bay Area. I can understand that demand drives their numbers so I had to look to find a supermarket that stocks imported Asian ingredients when I needed them for this dish. How does this fit in with this week's #SundaySupper theme of On The Hunt? Well, the ingredients used may either be sourced through traditional hunting methods, foraged (mushrooms, for example), or hunted down online or at far away ethnic supermarkets. For me, I chose option C because I imagine I'd be just as bad shot as Dick Cheney and didn't know where to begin foraging for other items. I went to a local chain called Uwajimaya for my miso paste and mirin.

Let's discuss the dish. Definitely a fusion concept applying Japanese ingredient substitutions to the Italian risotto method, but would it taste good? I've profiled the risotto method here several times in the past so there's nothing new from an execution standpoint however I was intrigued.

The Challenge

Successfully combine a Japanese flavor profile into an Italian dish.

The Source

I adapted the dish from Foodista

Ingredients

5 to 6 cups water
3 tablespoons white miso paste
2 tablespoons peanut oil
1 shallot, chopped
1 tablespoon fresh ginger, minced (approximately 1-inch piece ginger root, peeled)
1 cup Arborio rice
Green leaves from 2 baby bok choy, julienned
1/2 cup mirin
1 tablespoon soy sauce
Freshly ground black pepper
2 tablespoons slivered almonds
2 green onions, sliced thin

Method

1. Combine the water and miso in a saucepan over medium heat and bring to a light simmer. Stir to dissolve the miso, then reduce the heat to keep warm.


2. Pour the oil in a skillet and place over medium heat. Once hot, sweat the ginger and shallots in the oil then add the rice to toast. Add the bok choy leaves and stir until wilted. Deglaze the skillet with the mirin, stirring until it evaporates. Add in the miso water, 1/2 cup to 1 cup at a time (eyeball it), stirring continually until each addition has been absorbed before adding another. Keep adding miso water and stir until the rice is al dente. (Start tasting the rice after three or four additions.)


3. Once the rice is cooked, stir in the soy and black pepper. Adjust the seasoning, if necessary, with more salt. Serve in warmed bowls garnished with green onions and almonds.

Successful?

Before I proceed, let me first thank Stacy of Food Lust People Love and Tara of Noshing with the Nolands for hosting this week's event!

I made a few ingredient substitutions of my own. I substituted soy sauce for tamari, which is similar to soy, but milder and gluten-free. I also increased the amount of water because I know that three-and-a-half cups of water is insufficient to fully cook 1 cup of Arborio rice. I also found baby bok choy were a little more forgiving when julienned and did not need to remove the white stems.

From an execution standpoint, I found that, as the water evaporated during the process of stirring, the miso remained and became difficult to stir which prevented the grains of rice from cooking as evenly as I would have liked. I would recommend it only for those who are experienced with preparing more traditional risotto flavors. I recommend this more traditional preparation of risotto if you want to prepare risotto and have never done so. Ultimately Mrs. Stuntman only ate about half and quipped "Next time, just prepare my favorite. You know, the one with bacon and peas." I must admit, the dish was reminiscent of a poorly prepared fried rice.

For the record, Uwajimaya is about 8 miles away from my front door, but it's about a twenty minute drive without taking freeways, whereas the closest Asian supermarket from my previous residence was about half in distance and travel time. So despite my troubles with it, I am thankful for this dish because it presented the opportunity to explore my neighborhood and become more familiar with it.

Before you go, please review the other more successful #SundaySupper dishes that also feature ingredients that have been obtained on the hunt:

Spread it on Thick
Nibbles and Sides
The Main Event
Sweet Treats
Sunday Supper MovementJoin the #SundaySupper conversation on Twitter on Sunday! We tweet throughout the day and share recipes from all over the world. Our weekly chat starts at 7 p.m. ET.  Follow the #SundaySupper hashtag and remember to include it in your tweets to join in the chat. To get more great Sunday Supper Recipes, visit our website or check out our Pinterest board.

Would you like to join the Sunday Supper Movement? It’s easy. You can sign up by clicking here: Sunday Supper Movement.

Friday, June 6, 2014

Light Stunt: Chicken Stir Fry with Spinach and Peanuts

Chicken Stir Fry with Spinach and Peanuts


Call this my first cookbook review.

A while back a college friend had given Mrs. Stuntman and I a copy of Fifty Shades of Chicken by FL Fowler. As you can imagine, I was a little skeptical. The book does contain fifty chicken preparations divided into three sections: the first using whole bird, the second using chicken parts and the third more complicated dishes. Preceding each recipe is some really corny dialog about how a chicken feels about being prepared. I'd rate it a PG-13.

So the other night, I was thumbing through the book looking for last minute dinner ideas and found this dish that looked appealing.

The Challenge

Determine whether this book is more style than substance.

The Source

Adapted from page 88

Ingredients

1 pound boneless skinless chicken thighs, cut into bite-size pieces
Kosher salt
Freshly ground black pepper
1/3 cup chicken stock
1 1/2 tablespoons soy sauce
1 teaspoon corn starch
1 teaspoon honey
1 1/2 tablespoons peanut oil
1 1/2 teaspoons toasted sesame oil
1 bunch scallions, chopped fine (separate whites from greens)
2 cloves garlic, minced
1 tablespoon fresh ginger, minced
1/8 teaspoon red pepper flakes
4 cups baby spinach
1/2 cup roasted peanuts
Cooked white rice, for serving

Method

1. Finish the mise en place: Season the chicken with salt and pepper. Whisk together the chicken stock, soy sauce, corn starch and honey, then set aside.


2. Sear the chicken: Put the peanut oil and sesame oil in a large non-stick skillet and place over medium-high heat. Once the oil starts to smoke, add the chicken and fry, stirring frequently until almost cooked through, approximately five to seven minutes. Remove the chicken to a plate and set aside once the chicken has browned.


3. Flavor the stir fry: Once the chicken has been removed, add the garlic, ginger, red pepper flakes and scallion whites. Stir until fragrant which should take a minute or two. Add the spinach and stir until wilted, an additional minute. Deglaze the skillet with the chicken stock mixture and bring to a rapid simmer, scraping up any fond from the bottom of the skillet. Once the fluids thicken, add the chicken, peanuts and scallion greens and cook until the chicken is cooked through, approximately one to two minutes. Toss to combine then serve over rice.


Successful?

If you can look past the cheesy elements of this book, it's a good book for beginning cooks. Mrs. Stuntman also enjoyed the dish which came together rather quickly; perfect for a weeknight meal.

Thursday, May 15, 2014

Presenting: Asian Chicken and Cabbage Salad


Asian Chicken and Cabbage Salad


This post was fairly spontaneous. The weather this week has been very warm where I live. The predicted high temperature in San Francisco the day I typed this was 94 which is highly unusual. To give you an idea, a thirty minute drive east during the hottest days of July when it can often reach over 100, it's common for San Francisco not to break 80. This past Monday, after listening to the weather forecast I made a list to purchase ingredients for warm weather dishes such as ceviche and gazpacho. I also looked at salads and found one on Bon Appétit magazine's website that sounded refreshing.

It's subjective, but I'm also slowly coming to the realization that I take my best pictures outdoors. The picture of the gazpacho I referred to above wasn't taken by me, but my strawberry dessert I published last September and the Moscato themed dessert from a couple of weeks ago were, so I thought I could use the practice.

You might also contrast this salad to the salad I published for the Five Ingredients or Less #SundaySupper event because there are more than five ingredients in the dressing. I didn't adapt the recipe, so you can get it here.

Thursday, May 8, 2014

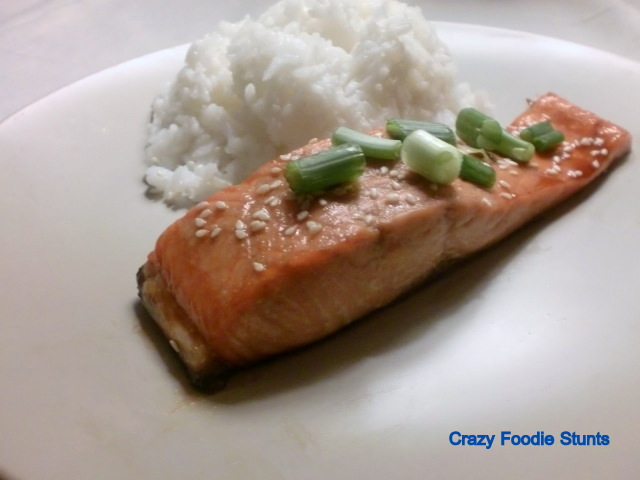
Light Stunt: Salmon Teriyaki

Salmon Teriyaki


One dish that is in my weeknight dinner rotation is the chicken teriyaki dish I published two years ago. I'll prepare it about once or twice per month. Recently, Mrs. Stuntman requested salmon for dinner one evening so I found a recipe for it in my new Chef Carla Hall cookbook when it occurred to me to compare the two teriyaki sauces.

The Challenge

A recipe contest: Is America's Test Kitchen's teriyaki or Chef Hall's teriyaki better?

The Source

Adapted from page 92 of Carla's Comfort Foods: Favorite Dishes from Around the World by Carla Hall with Genevieve Ko.

Ingredients

1/4 cup packed brown sugar (light or dark is fine)
1/4 cup water
2 tablespoons soy sauce
1/2 teaspoon rice vinegar
1 1-inch piece of fresh ginger, peeled and sliced into thin disks
1 garlic clove, smashed with the side of a knife
4 6-ounce center-cut salmon fillets
2 green onions, sliced thin (for garnish)
1/2 teaspoon sesame seeds (for garnish)

Method

1. Place broiler rack 6 inches from the heat source and preheat the broiler to high. In a small saucepan, combine the first six ingredients and bring to a boil, stirring the mixture so the sugar dissolves. Reduce the heat and simmer until the mixture thickens, approximately ten minutes. Once complete, remove the ginger and garlic with a slotted spoon and discard.


2. Place the salmon fillets on a foil-lined sheet pan and broil until the fillets are opaque on the surface, approximately five minutes. Remove from the broiler and glaze the sauce onto the fillets and return to the broiler until opaque on top, but still translucent in the center, approximately three minutes. Remove from the broiler and let it rest to allow for any carryover cooking. Transfer the salmon to serving plates and garnish with the green onions and sesame seeds. Serve with steamed white rice.


Successful?

In a word, yes. It's subjective, but Mrs. Stuntman liked Chef Hall's better.

Thursday, February 13, 2014

Tea Smoked Roast Chicken

Tea Smoked Roast Chicken


Cross this one off the To Do List.

I found this recipe several years ago but never got around to preparing it. It appealed to me because of the unusual cooking technique. Then it occurred to me that I already had many of the ingredients used to prepare the dish leftover from my chicken wings post, so the timing was good.

The Challenge

Unusual cooking method: Smoking a chicken using tea leaves.

The Source

This is a Chef Andrea Reusing found on Food & Wine magazine's website but I adapted some of the ingredients.

Ingredients

2 quarts water
6 cloves garlic, smashed
9 dried red chiles, divided
10 star anise pods, divided
3 tablespoons honey
Two-inches fresh ginger, peeled and thinly sliced
Zest of 1 small orange
1 1-inch piece of cinnamon stick
1 cup soy sauce
1 small yellow onion, quartered
1/4 cup plus 3 tablespoons sugar, divided
1 whole chicken, approximately 5 to 6 pounds
1/2 cup long grain white rice
1/4 cup plus 2 tablespoons loose jasmin tea
Vegetable oil, as needed
1 teaspoon Szechuan peppercorns, crushed
Kosher salt
Fried rice, for serving

Method

1. Brine the chicken. In a large stockpot, combine the water, garlic, 5 of the red chiles, 4 star anise pods, honey, ginger, orange zest, cinnamon, onion and 1 tablespoon sugar. Simmer the brine over medium heat for 10 minutes, then remove from heat and let it cool. Once the brine has reached room temperature, add the chicken to the stockpot. Rotate the chicken so that the brine has coated all of the skin, then rest it so it is breast side down.

Cover and refrigerate overnight.

2. Smoke the chicken. Preheat the oven to 375° Fahrenheit, then line a stovetop-safe roasting pan with a double layer of aluminum foil. Remove the chicken from the brine and discard the brine. Pat the chicken inside and out with paper towels, then truss the chicken. Break the remaining red chiles and star anise into pieces, then combine them with the rice, remaining sugar, and tea. Pour the tea mixture into the roasting pan so that it coats the bottom evenly.


Place a rack on top of the tea mixture, then the chicken in the rack, breast side up. Cover the roasting pan with aluminum foil, sealing all sides, plus any overlapping pieces of foil with tape. Place the roasting pan over high heat for 2 minutes, then reduce heat to medium-low for 5 minutes. Remove from heat entirely and let it stand for 3 minutes. Remove the aluminum foil cover and let it rest for an additional 10 minutes.


3. Roast the chicken. Remove the rack with the chicken from the roasting pan, then the aluminum foil from the bottom along with the tea mixture. Return the rack back to the roasting pan, then rub oil over the chicken. Season them with the Szechuan peppercorns and kosher salt. Roast the chicken in the upper third of the oven for 35 minutes, then increase the heat to 425° Fahrenheit and roast for an additional 35 minutes, or until an instant read thermometer reads 165° Fahrenheit. Remove from oven, but let the chicken rest for approximately 10 minutes. Carve and serve with fried rice.

Successful?

The flavor of the tea was subtle, but still very good. I'd also recommend monitoring the chicken periodically while it roasts at 425° Fahrenheit. If it browns excessively, cover it with aluminum foil and continue roasting.

Sunday, January 26, 2014

Beer Braised Szechuan Chicken Wings for a Game Day Entertaining #SundaySupper with Gallo Family Vineyards

Beer Braised Szechuan Chicken Wings


I alluded to my love for football about a year ago with a quick pasta dish. I will further specify that I grew up a fan of the San Francisco 49ers, so I laughed when I read the theme for this week's #SundaySupper event with Gallo Family Vineyards, Game Day Entertaining and Pairings, because fans of my team used to have a reputation of being soft (i.e. the wine and cheese crowd) which contrasted with the fans of the other team across the San Francisco Bay. (On a side note, I was relieved when San Francisco lost to Seattle because I don't think Kaepernick would have been able to keep up with Manning, but that's an entirely different discussion.)

If you're unfamiliar with Gallo Family Vineyards, they have a store locator where you can find their wines, and can be found on facebook, twitter, Instagram, and YouTube. They also have a fun crest creator which you can customize. I did one myself you can see below. In the interest of full disclosure, compensation was provided by Gallo Family Vineyards via Sunday Supper, LLC. The opinions expressed herein are those of the author, and are not indicative of the opinions or positions of Gallo Family Vineyards.


GFV also sponsored a previous #SundaySupper event last month. During the twitter chat that week, a portion of the discussion centered around Moscato, which I had never tried. I was intrigued so when I was selected to participate in this week's event, I selected their white Moscato to use for my dish, however I hadn't realized it was a sweet wine when I did. I prefer dry wines such as chardonnays and cabernets because I usually pair them with savory dishes if I'm enjoying a glass with dinner or cook with them. I'm not really a dessert guy and can't appreciate sweet cocktails so I did a google search for wine pairings and one suggestion for Moscato was Chinese food. Many spicy dishes in their cuisine pair well with the sweet wine.

The Challenge

Pair a sweet wine with a spicy appetizer.

The Source

I adapted a chicken wings dish on Cooking Channel's website I thought would make for great game day entertaining.

Ingredients

2 pounds chicken wings, wing tips removed, then cut at the joint
1/2 cup soy sauce
1/4 cup dark brown sugar
2 tablespoons minced garlic
1 tablespoon minced fresh ginger
1 teaspoon Chinese five-spice powder
1 teaspoon Szechuan peppercorns, dry toasted until fragrant
5 dried red chiles, crushed
1 bunch scallion greens, cut in 2-inch pieces
1 star anise
1/4 cup rice vinegar
2 12-fluid ounce bottles ale beer
4 tablespoons unsalted butter
1 cup corn starch
1 cup all-purpose flour
Vegetable oil, for frying
1 teaspoon chives, chopped fine (for garnish)

Method

1. Marinate the wings: Combine the wings, soy sauce, sugar, garlic, ginger, five-spice, Szechuan peppercorns, dried chiles, scallion greens and star anise in a resealable bag and toss until the chicken is coated in the marinade. Refrigerate overnight.

2. Braise the wings: Empty the contents of the resealable bag into a large Dutch oven. Add to it the ale and rice vinegar. Bring the oven to a boil on the stovetop then reduce the heat and simmer, uncovered, until the wings are tender and the meat is almost falling off the bone, approximately 1 hour. Remove the wings onto a platter in a single layer and refrigerate until cold, reserving the braising fluid.


3. Fry the wings: Place enough vegetable oil in a large pot to reach a depth of at least 1 1/2 inches and heat to 375° Fahrenheit. Combine the corn starch and flour, then dredge each wing into the mixture and shake off any excess. Deep-fry the chicken, in batches if necessary, in the oil until deep brown and crisp, approximately 3 minutes, taking care to not overcrowd the pot. Remove the wings with a slotted spoon to a large bowl.


4. Finish the dish: While the wings are frying, place the braising fluid over medium heat and reduce until it is thick enough to coat the back of a spoon. Strain out and discard the solids, then return the braising fluid to the heat and whisk in the butter. Pour the fluid into the bowl with the chicken and toss until well coated. Serve immediately garnished with the chives and accompanied by Moscato.


Successful?

I need to confess that I didn't have time to marinate the wings overnight so the spicy flavors were muted, which suits me well since I dislike strong spicy dishes. The spice was just enough to complement the sweet flavor of Gallo Family Vineyards Moscato. Mrs. Stuntman also enjoyed this dish so much that these wings might make an encore appearance on Super Bowl Sunday.

Other Sunday Supper Participants

And finally, please check out this week's other Sunday Supper contributors:

Sunday Supper Movement


Join the #SundaySupper conversation on twitter on Sunday! We tweet throughout the day and share recipes from all over the world. Our weekly chat starts at 7:00 pm ET.  Follow the #SundaySupper hashtag and remember to include it in your tweets to join in the chat. Check out our #SundaySupper Pinterest board for more fabulous recipes and food photos.

Would you like to join the Sunday Supper Movement? It’s easy. You can sign up by clicking here: Sunday Supper Movement.

Friday, January 25, 2013

Mustard-Brown Sugar Glazed Salmon with Lemon Rice Pilaf and Paying It Forward

Mustard-Brown Sugar Glazed Salmon with Lemon Rice Pilaf


This dish will separate itself from the others I've posted here because I'm trying to save my sanity, not display my dementia. Mrs. Stuntman grew up in the Philippines eating steamed white rice at every meal. Don't get me wrong. I like rice, but the rice she normally prepares is very bland.

Come to think of it, I could have probably used this dish this past Sunday during the retro recipe examples because whenever I went out to restaurants as a kid, I always ordered rice pilaf as a side dish, if given the choice.

The Challenge

Add flavor to a side dish

The Source

The salmon was adapted from page 278 of America's Test Kitchen Family Cookbook Third Edition: Cookware Rating Edition. For the rice, I used a Chef Ming Tsai recipe I found on foodnetwork.com.

Ingredients

For the rice:
2 tablespoons extra-virgin olive oil
1 large onion, diced
1 tablespoon fresh ginger, minced
1 tablespoon lemon zest
2 cups long-grain white rice
1/2 cup white wine
3 cups chicken stock
2 tablespoons fresh Italian parsley, chopped

For the salmon:
4 6-ounce salmon fillets, 1 1/4-inch thick
kosher salt
freshly ground black pepper
1/4 cup packed light brown sugar
3 tablespoons cider vinegar
3 tablespoons coarse-grain mustard
1 tablespoon vegetable oil
2 cloves garlic, minced

Method

1. Preheat the oven to 500° Fahrenheit. Prepare the glaze by whisking together the brown sugar, vinegar, mustard, garlic and oil. Season the glaze with 1/2 teaspoon kosher salt and 1/4 teaspoon freshly ground black pepper.


2. Prepare the rice: Heat the oil in a large skillet over high heat. Once the oil shimmers, add the onion, ginger, and lemon zest and sweat until soft, about 2 minutes. Add the rice and cook, stirring until the rice is opaque, about 5 minutes. Deglaze with wine and reduce by 80 percent. Add the chicken stock, cover and simmer over low heat for 25 to 30 minutes.


3. While the rice simmers, cook the salmon: Remove any pin bones from the salmon. Pat the fillets dry with a paper towel and season them with kosher salt and freshly ground black pepper. Place the fillets about 1-inch apart on a lightly-oiled aluminum foil-lined baking sheet. Bake for 5 minutes. Baste the glaze over the tops and sides of the salmon. Return to the oven and bake until the fish turns from translucent to opaque, about 5 minutes. Brush the glaze again and serve on a bed of the rice and garnish with parsley.


Successful?

I recommend seasoning the rice with salt and pepper to taste before plating, but the rice is definitely more flavorful. The salmon was well-balanced in flavor.

In other news, one of my food blogger friends, Jenni of Pastry Chef Online is hosting a linky party this month spotlighting other blogs we enjoy. I do have a blogroll, but I haven't updated it in a while so I wanted to add to it.

I've noted Willow of Will Cook for Friends a number of times here and admire her ambition for learning about food, but had not added her to my list of favorites so I wanted to correct that oversight.

I met Stefanie of Sarcastic Cooking via foodbuzz when it was still around after she was featured with some degree of regularity. She prepares delicious food and I also lover her photography.

Sarah of Crispy Bits & Burnt Ends actually found me, but I have since come to appreciate her writing style.

Mijune of Follow Me Foodie is a food writer out of Vancouver, British Columbia. I enjoy her wit and humor.

Joanne of Fifteen Spatulas and I share the same philosophy on food: homemade, from scratch and with step-by-step pictures. I've also met her in person and can say that she is very easy to work with.

Check out the other Pay It Forward participants in addition to Jenni's list, which can be viewed on her website, here.

Friday, January 18, 2013

Ginger Ale from Scratch

Ginger Ale from Scratch


Recently, I met Tony of Simple Awesome Cooking through Food Bloggers Network. Normally not a noteworthy event, but he stood out because our blogs' are polar opposites. While he focuses on simple preparation, I love a challenging food. I'm not knocking food that isn't complex and/or time consuming, I just don't publish it here.

After trading emails, he noted in the next few weeks he would be publishing a homemade ginger ale recipe. As my readers know, I love making food from scratch that can easily be bought at supermarkets so I wanted in on the action. We agreed to publish the same dish on the same day using our own styles. This isn't meant to be competitive, but a comparison between two means to the same end. Before you continue forward, please stop and read about Tony's ginger ale recipe here.

The Challenge

Make food easily found at a supermarket at home.

The Source

As I reviewed recipes for homemade ginger ale, I noticed many used club soda or sparkling water to achieve carbonation in their beverage but I liked this one by Alton Brown I found on Food Network's website because it generated carbonation without that crutch.

Ingredients

5 tablespoons fresh ginger, grated finely
3/4 cup sugar
7 1/2 cups filtered water
1/8 teaspoon active dry yeast
2 tablespoons lemon juice, freshly squeezed

Method

1. Place the ginger, sugar, and 1/2 cup of the water into a 2-quart saucepan and set over medium-high heat. Stir until the sugar has dissolved. Remove from the heat, cover and allow to steep for 1 hour.

2. Pour the syrup through a fine mesh strainer set over a bowl, pressing down to get all of the juice out of the mixture. Chill quickly by placing over and ice bath and stirring or set in the refrigerator, uncovered, until at least room temperature, 68° to 72° Fahrenheit.


3. Using a funnel, pour the syrup into a clean 2-liter plastic bottle and add the yeast, lemon juice and remaining 7 cups of water. Place the cap on the bottle, gently shake to combine and leave the bottle at room temperature for 48 hours. Open and check for desired amount of carbonation. It is important that once you achieve your desired amount of carbonation that you refrigerate the ginger ale. Store in the refrigerator for up to 2 weeks, opening the bottle at least once a day to let out excess carbonation.


Successful?

When I went to open the beverage, it almost exploded (think of a cola can shaken up), so I proceeded slowly. It's interesting that my experience with the beverage was different than many of the reviews: The carbonation did not fizz out and the ginger flavor was strong. Ultimately, a success.